The Problem With Claims Today
Insurance claims are slow, inconsistent, and painful — for everyone involved. An adjuster opens a claim and immediately becomes a human integration layer: cross-referencing the policy database, scrolling through uploaded receipts and photos, comparing incident dates against coverage windows, and writing the decision email by hand. One missed detail means a wrong decision. One wrong decision means an unhappy customer, a compliance risk, or a costly rework loop.
This isn’t a people problem. It’s a process problem. The decision logic is well-defined, the data sources are well-known, and the customer-facing communication follows a predictable shape. What’s missing is a system that can connect the data sources, apply the rules consistently, and produce an auditable decision in minutes instead of days.
That’s exactly what an agentic workflow is built for. This post walks through the full architecture of a Claim Processing Agent — every node, every prompt, every integration — that we built to handle the intake-to-decision flow end to end.
The Architecture at a Glance
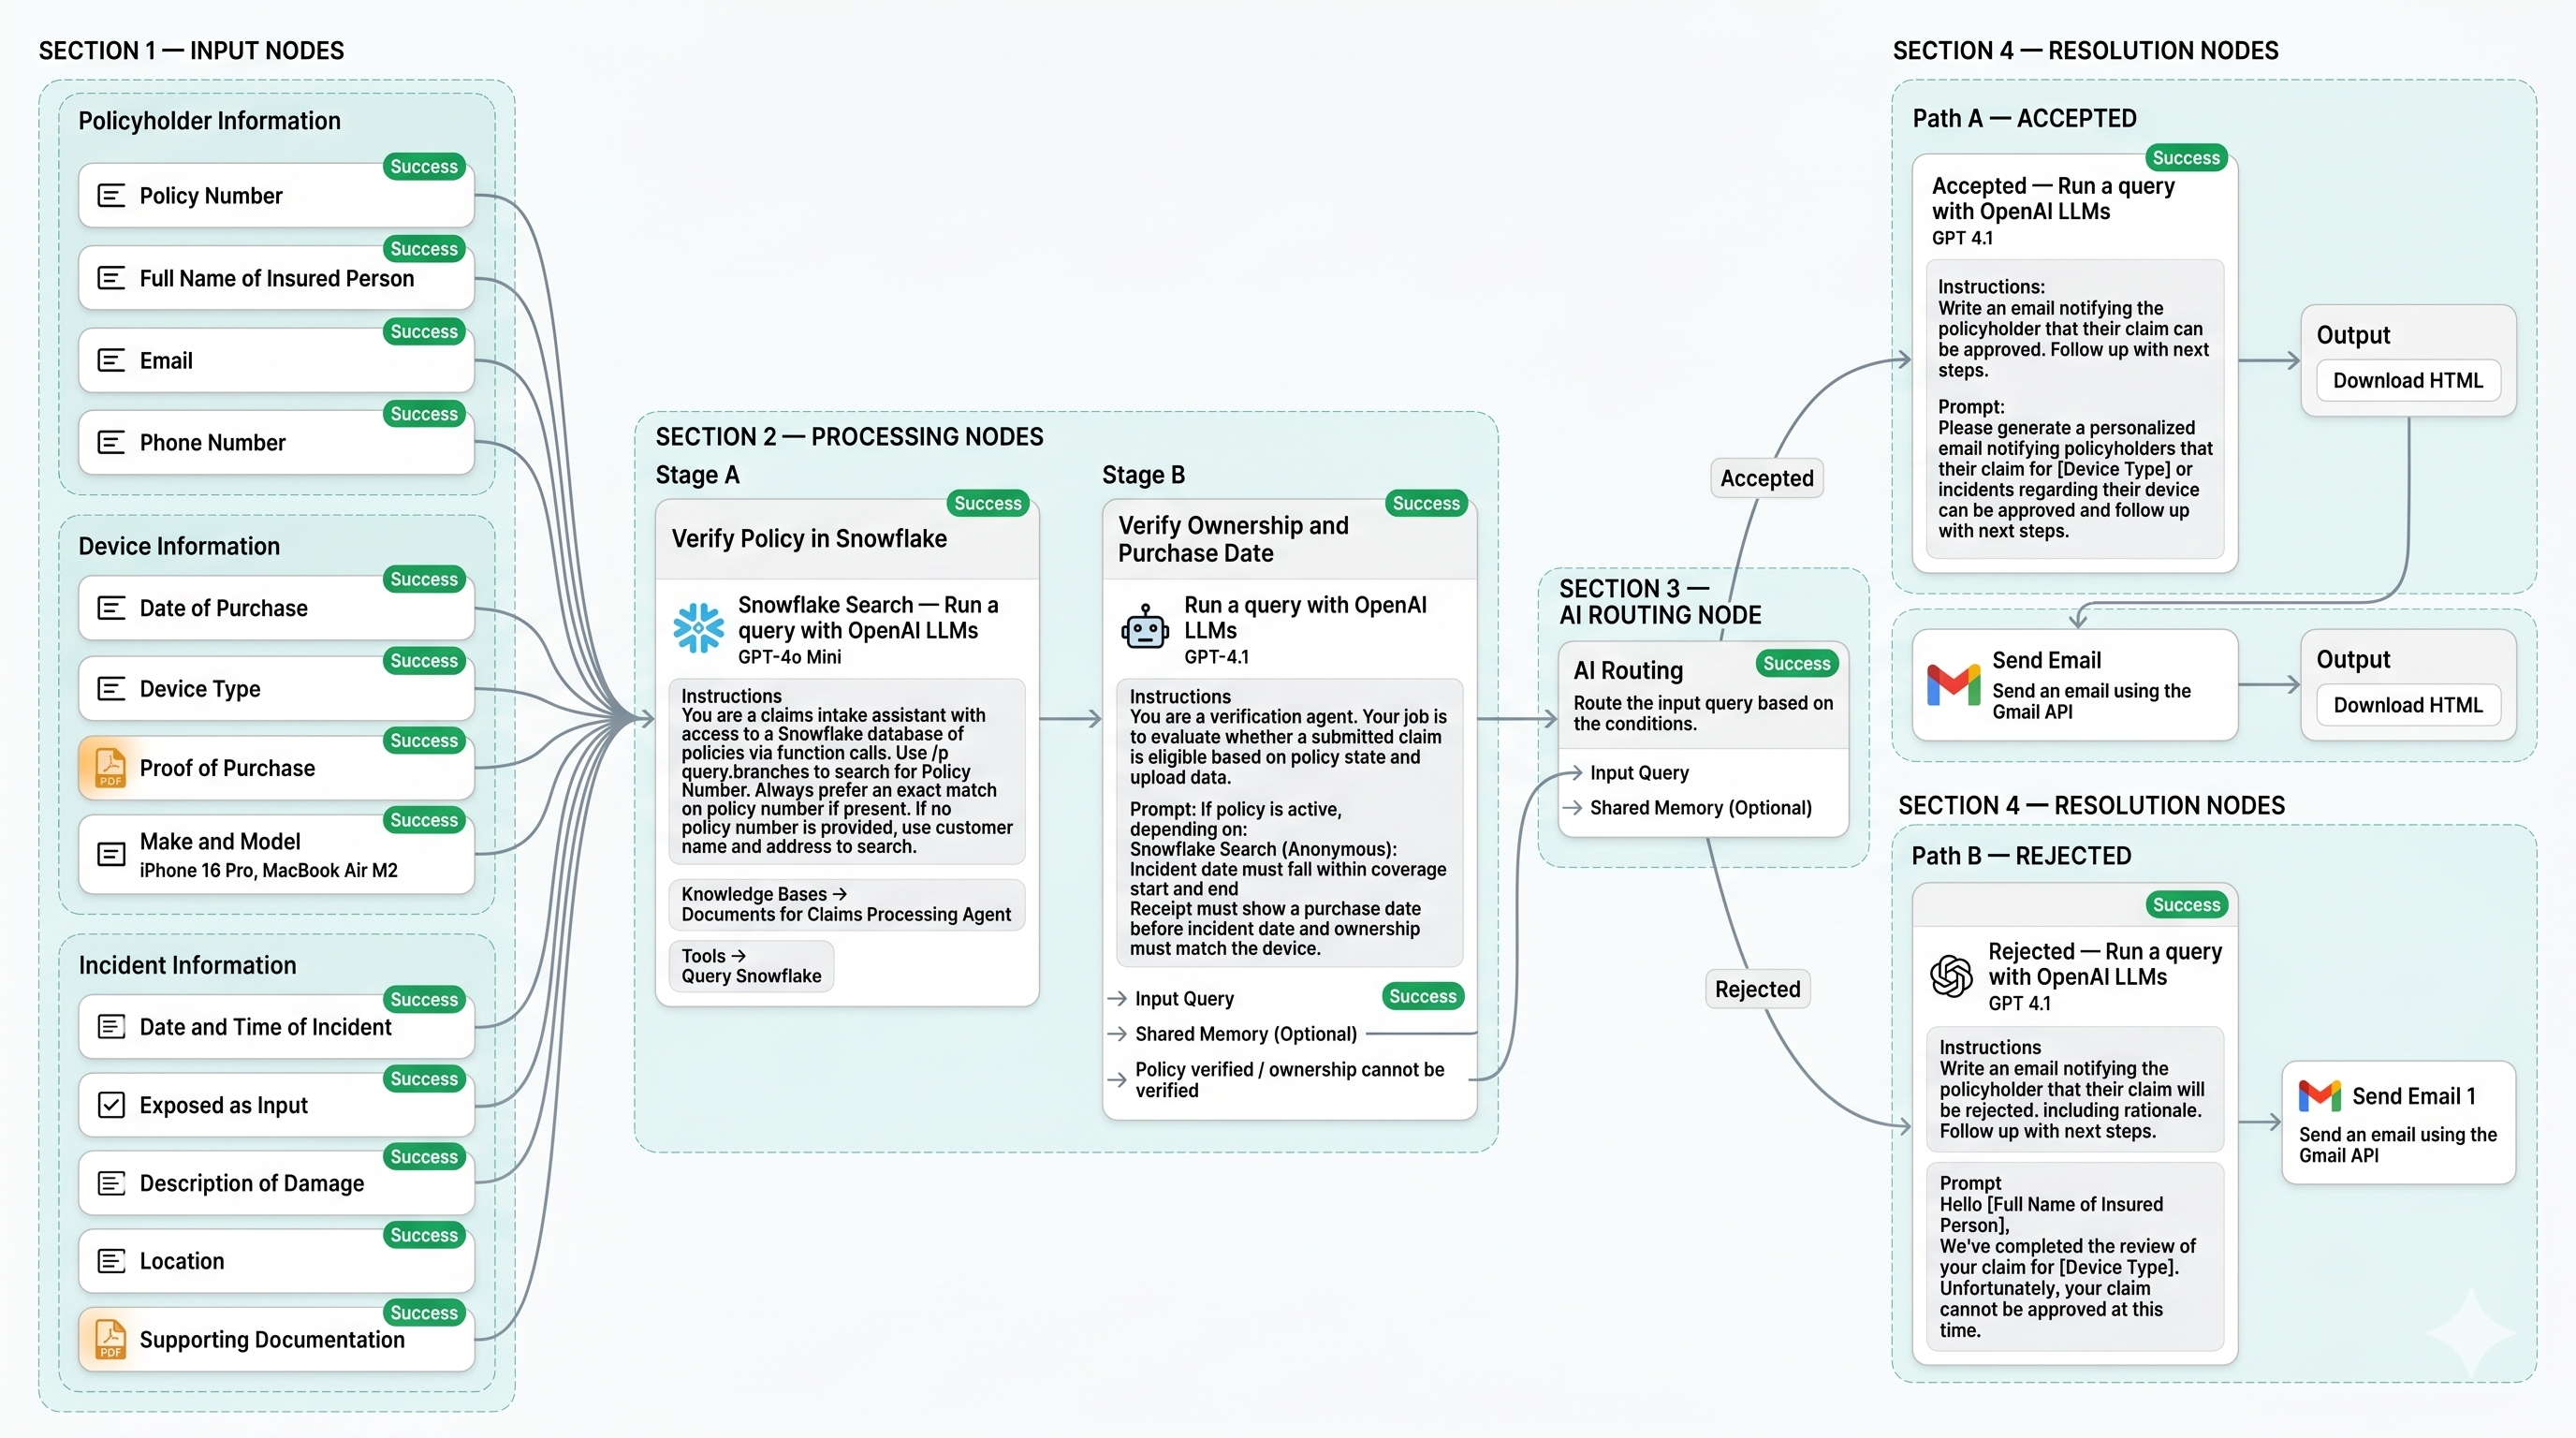
The agent is structured as four sections wired together as a single deterministic flow:
- Input Nodes — structured intake of policyholder, device, and incident information
- Processing Nodes — two-stage verification (policy lookup in Snowflake, ownership/eligibility check against uploaded documents)
- AI Routing Node — a router that branches the workflow on the verification result
- Resolution Nodes — two parallel paths (Accepted / Rejected) that generate a personalized email and dispatch it via the Gmail API
Each node has a clear contract: typed inputs, a defined LLM (or tool) call, and a deterministic output that the next node can consume. The whole thing runs without human review for the happy path, and surfaces a rejection rationale that a human can audit when something is off.
Section 1 — Input Nodes (Structured Intake)
Most claim agents fail at intake. They try to extract structure from a free-text customer email, and by the time the LLM has guessed at a policy number and a date, the rest of the workflow is already poisoned. We solve this by making intake strictly structured — the policyholder fills out a form, and the form fields become typed inputs to the agent.
Three input groups feed the workflow:
Policyholder Information
- Policy Number
- Full Name of Insured Person
- Phone Number
Device Information
- Date of Purchase
- Device Type
- Proof of Purchase (PDF upload)
- Make and Model (e.g. iPhone 16 Pro, MacBook Air M2)
Incident Information
- Date and Time of Incident
- Description of Damage
- Location
- Supporting Documentation (PDF upload)
Every field is exposed as a node input — meaning the downstream LLM nodes can reference them by name ({Policy Number}, {Device Type}, etc.) without any prompt-side parsing. PDFs are handled as file references that the document-aware nodes can read directly. This single design choice eliminates an entire category of failure modes that pure-chat agents struggle with.
Section 2 — Processing Nodes (Two-Stage Verification)
The processing layer is where the actual decision logic lives. It runs in two stages — and the split matters, because each stage uses a different model and a different tool surface.
Stage A — Verify Policy in Snowflake (GPT-4o Mini)
The first stage is a pure data lookup. The agent connects to Snowflake via a function-call tool (Query Snowflake) and resolves the submitted policy number against the policies table.
Why GPT-4o Mini? This stage is bounded — it’s a SQL-shaped lookup with a small set of branches. We don’t need a frontier model here; we need a fast, cheap one that follows tool-use instructions reliably. GPT-4o Mini is the right cost/latency point.
System instructions (paraphrased from the production prompt):
You are a claims intake assistant with access to a Snowflake database of policies via function calls. Use
/p query.branchesto search for Policy Number. Always prefer an exact match on policy number if present. If no policy number is provided, use customer name and address to search.
The Knowledge Base attached to this stage is a curated set of internal claims-processing documents — the SOPs that describe how an adjuster would normally resolve ambiguous lookups. The LLM treats them as guidance, not as ground truth; the ground truth is whatever Snowflake returns.
Output of Stage A: the resolved policy record (active / lapsed / not found) with the coverage start and end dates.
Stage B — Verify Ownership and Purchase Date (GPT-4.1)
The second stage is harder. Here the agent has to reason across three sources at once:
- The Snowflake policy record from Stage A
- The Proof of Purchase PDF (a receipt)
- The Supporting Documentation PDF (incident photos, ownership evidence)
It must answer a single yes/no question: is this claim eligible based on the policy state and the upload data? That requires reading the receipt, extracting the purchase date and the device identifier, comparing them against the policy’s coverage window and the device on the claim, and producing a clean verdict.
Why GPT-4.1? This is the reasoning step. The model has to handle multi-modal evidence (text + PDF), apply layered rules, and produce a confident verdict with an explanation. A frontier model earns its cost here.
Production prompt (verbatim shape):
You are a verification agent. Your job is to evaluate whether a submitted claim is eligible based on policy state and upload data.
If policy is active, depending on:
- Snowflake Search (anonymous): Incident date must fall within coverage start and end
- Receipt must show a purchase date before incident date and ownership must match the device
Output of Stage B: one of three signals
Policy verified— fully eligiblePolicy verified / ownership cannot be verified— partial; routes to Rejected with a clear rationalePolicy not activeorOutside coverage window— routes to Rejected
The Stage B output is the single signal that drives the router. Everything downstream is deterministic from this point.
Section 3 — The AI Routing Node
The router is the simplest node in the system, but architecturally it’s the most important. It takes the Stage B output and routes the claim down one of two paths: Accepted or Rejected.
The router has two inputs:
- Input Query — the verification verdict from Stage B
- Shared Memory (optional) — context the resolution nodes might need (policyholder name, device type, incident date)
By isolating the routing decision in its own node — rather than baking it into the Stage B prompt or the resolution prompt — we get three architectural wins:
- Auditability. Every claim has a single, inspectable routing decision. When something goes wrong, you know exactly which condition fired.
- Composability. Adding a third path (e.g. “Manual Review”) is a router edit, not a rewrite of the verification stage.
- Determinism. The router is rule-based, not creative. The LLM doesn’t decide what to write to the customer until it knows which path the claim is on.
This is the pattern I want every team building agentic workflows to internalize: let the LLM reason, but let the structure decide. Routing is structure.
Section 4 — Resolution Nodes (Two Paths)
Once the router has decided, one of two resolution paths fires.
Path A — Accepted (GPT-4.1 → Gmail)
If the claim is eligible, the Accepted node runs an LLM call (GPT-4.1) with these instructions:
Write an email notifying the policyholder that their claim can be approved. Follow up with next steps.
Prompt: Please generate a personalized email notifying policyholders that their claim for
[Device Type]or incidents regarding their device can be approved and follow up with next steps.
The output is HTML (downloadable for audit) and a structured email payload. A Send Email node then dispatches it via the Gmail API, using the policyholder’s email from the intake form.
Path B — Rejected (GPT-4.1 → Gmail)
If the claim is rejected, the Rejected node runs a parallel LLM call with these instructions:
Write an email notifying the policyholder that their claim will be rejected, including rationale. Follow up with next steps.
Prompt: Hello [Full Name of Insured Person], We’ve completed the review of your claim for [Device Type]. Unfortunately, your claim cannot be approved at this time.
The rationale isn’t generic — it’s pulled from the Stage B output, so the customer sees a specific reason (“the receipt date is after the incident date” or “the policy was lapsed on the incident date”). This is the difference between a rejection that feels like a brick wall and one that feels like a clear next step.
How to Build This Yourself — Setup Walkthrough
Here is the concrete setup, step by step. The exact builder UI varies (n8n, Vellum, LangFlow, Zapier Central, internal platforms — they all support this same pattern), but the components are universal.
1. Provision the Data Layer
- Snowflake. Create a
policiestable with at minimum:policy_number,customer_name,address,device_type,make_model,coverage_start,coverage_end,status(active / lapsed). Add a service account with read-only access scoped to thepoliciestable. - Document storage. PDFs uploaded by the customer go into S3 (or your equivalent object store) with a presigned URL passed to the LLM nodes. Don’t paste raw PDF bytes into the prompt.
2. Build the Intake Form
Use whatever form tool fits your stack — Typeform, Tally, an internal React form, or a Slack workflow. The only hard requirement: each field is a typed input that the agent platform can reference by name.
For the two PDF fields (Proof of Purchase, Supporting Documentation), upload to object storage and pass the file URL into the agent — not the raw bytes.
3. Configure Stage A — Snowflake Lookup
- Model: GPT-4o Mini (or equivalent — Haiku 4.5 works well here too).
- Tool: A
Query Snowflakefunction that takespolicy_numberandcustomer_nameas parameters and returns the matched row. Implement it as a server-side function call so credentials never touch the LLM. - Knowledge Base: Attach your internal claims SOPs as retrieval documents. Keep them as Markdown — the model handles them better than PDFs.
- Output schema: force the model to emit a JSON blob with
policy_status,coverage_start,coverage_end,policy_record_id. Schema-constrained output is what makes Stage A reliable.
4. Configure Stage B — Eligibility Check
- Model: GPT-4.1 (or Claude Sonnet 4.6 — both handle multi-document reasoning well).
- Inputs: Stage A output, the two PDF URLs, and the structured intake fields.
- Multi-modal handling: if your platform supports native PDF input (most frontier APIs now do), pass the PDFs directly. Otherwise, run a one-shot OCR pass first and feed the text.
- Output schema: force a JSON output with
verdict(one ofaccepted/rejected_ownership/rejected_coverage/rejected_policy_inactive) andrationale(a one-paragraph human-readable explanation).
5. Wire the Router
Add a routing node with two branches:
verdict == "accepted"→ Path A- otherwise → Path B (the rationale string from Stage B becomes the input to Path B’s email prompt)
If your platform calls this an “if/else”, a “switch”, or an “AI router”, they all work — the key is that the branching condition is the verdict, not a fresh LLM judgment.
6. Configure the Resolution Nodes
Both paths share the same pattern: an LLM call that generates a personalized HTML email, followed by a Gmail (or SES, or SendGrid) node that dispatches it.
- Model: GPT-4.1 is fine for both. The prompt is short and the output structure is fixed.
- Personalization: pass the intake fields as variables —
{Full Name of Insured Person},{Device Type},{Date of Purchase}. Don’t let the model invent these. - HTML output: keep a single shared email template. The LLM fills the body; the template handles header, footer, and branding.
7. Add Observability
This is the part teams skip and regret. Three things are non-negotiable:
- Structured logs at every node. Inputs, outputs, model used, token counts, latency.
- A claim trace. A single ID that follows the claim from intake through email dispatch — so when a customer calls about claim
CL-12345, you can pull every node’s output in one query. - A rejection review queue. Every rejected claim writes to a queue that a human can scan. Even at high accuracy, you want eyes on the rejection set for the first 60 days.
8. Test the Failure Modes Before Production
The agent will work on the happy path on day one. The failures are where you earn reliability:
- A policy number that doesn’t exist (Stage A must return
not_found, not hallucinate) - A receipt date after the incident (Stage B must catch this; this is the most common fraud pattern)
- A policy that lapsed during the coverage window
- A device on the receipt that doesn’t match the device on the claim
- Corrupt or unreadable PDFs (Stage B must return
evidence_unreadableand route to manual review, not auto-reject)
Build a test set of 30–50 synthetic claims covering these cases. Run it after every prompt change. This is the difference between a demo and a system you can put in front of customers.
What Makes This Architecture Work
The pattern in this post is not specific to insurance. It’s a general recipe for any structured decision workflow where the inputs are well-defined, the rules are stable, and the output is a customer-facing decision. Loan approvals, refund requests, warranty claims, content moderation, KYC checks — they all map to the same shape.
Three principles separate workflows that ship from workflows that demo:
- Structured intake, not chat. The form is the contract. The LLM never has to guess what a policy number is.
- Tools for facts, models for judgment. Snowflake holds the truth; the LLM only reasons about it. This is the line that prevents hallucinated decisions.
- Routing is structure, not creativity. The router is rule-based. The LLM doesn’t decide what to do — it decides what to say once the structure has decided what to do.
The result, when wired together correctly, is an agent that makes decisions in minutes, produces an auditable trail for every claim, and gives the customer a clear, personalized response on either path. That’s the bar. Anything less is a chatbot.
Where This Goes Next
Two extensions are worth flagging:
- Manual Review path. Add a third router branch for low-confidence verdicts (e.g., evidence unreadable, ambiguous device match). The agent’s job becomes triage, not auto-decision, on the long tail.
- Self-improving prompts. Log every rejected claim that a human later overturned. Feed those into a weekly prompt-tuning pass. Within a few months, the verdict accuracy curve flattens.
If you’re building something in this shape — claims, refunds, approvals, compliance checks — and you want to compare notes on the routing layer or the verification stage, I’d be glad to walk through it.